Things you will need…
Please read this section very carefully.
All two-way radios used in Australia & New Zealand require frequencies. These frequencies allocated to you by the ACMA as part of your licence. These frequencies are shown on your ACMA licence documentation.
If you have an existing radio that you want to copy the settings from (for example a previous set of radios), the existing radio will already have the ACMA-licensed frequencies programmed into the brain inside. In order to ontain these frequencies you will need to “read” the existing radio.
When copying form one radio to another, and they’re the exact same make and model radio, this is as easy as “Plug In Old Radio”, “Read”, “Unplug Old Radio”, “Plug In New Radio”, “Write”, “unplug new radio”. Done.
In almost all circumstances there are no glitches and hiccups. So if you follow this guide very carefully you will likely have success.
Note: Do not scan read this guide. Read it thoroughly. Then re-read it. You might have to read it 2-3 times if you’re new to programming.
Make sure you havre the following…
- The Old or Existing CLP Radio (if relevant)
Note: If you want your new radio to work with some old or existig radios, you will need the radio you are wanting to match up with in order to extract the information from inside. - Your New CLP Radios (to write your new programming to)
- Motorola HKKN4027 Programming Cable
- Motorola CLP Australia & New Zealand Software (FREE)
- Motorola PMPN4018 Single Unit Charger <- Usuaully Supplied with your CLP
- Fully Charged Batteries (Charge your radios 24 hours before programming)
- Patience
- Cup of Tea / Cup of Tea Coffee / Glass of Whisky
Note: We’re not going to cover installing the software here as it’s a standard Windows installation which most people are familiar with. But please note, it’s incredibly important that you unzip (here’s how and why) the files before installing.
Check List: Things To Do
- MAKE SURE THE RADIO BATTERY IS CHARGED: The radio will need enough charge to read/write data. A full charge for at least an hour before hand will be fine.
- SWITCH OFF THE RADIO: This should be done anyway – always switch of your radio when on charge. It will not only make your radio charge faster but it also helps keep the battery in good condition.
- PLUG IN THE USB CABLE: What USB Cable? Read the “Things You Will Need…” section above.
- CHECK DEVICE MANAGER: The cable will be installed as a COM device. Read this article here.
- Check cable drivers are installed properly. If they are it will say “this device is working properly”.
- Make a note of the COM port number. How? Read this article here.
- INSTALL THE MOTOROLA CLP SOFTWARE: Install the programming software well in advance of any planned programming. Please note that the software might be ZIPPED UP. So be sure to UNZIP it (here’s how and why) before installing it.
Initially Reading Your CLP Radio
The following steps will walk you through initially reading the radio. This is important because it shows you how to make a backup of your existing programming; which you can restore if you do anything wrong or break anything.
Note: We cannot stress this enough. Do not scan read this guide. Read it thoroughly. Then re-read it. You might have to read it 2-3 times if you’re new to programming.
Note: At this stage, we presume the software is already installed. If the software has not been installed, please install it. If you do not already have it, Radiotronics offers is FREE of charge.
Free software download (Australia / NZ & Asian Pacific):
Radiotronics offers the business radio programming software free of charge. You can download it by using the link below. Please note that this software applies to Australia, New Zealand & Asian Pacific region radios only. These are models CLP107, CLP117 and CLP107e.
- Australia, NZ & Asian Pacific: CLP107, CLP117 & CLP107e Programming Software
Note: This guide only applies to Australia, New Zealand & Asian Pacific region models. Radiotronics Auistralia cannot offer software for other regions. Australia, New Zealand & Asian Pacific region software does not work with radios from other regions. If you’re using any radio other than CLP107, CLP117 and CLP107e, we recommnd using Google to find the correct region software.
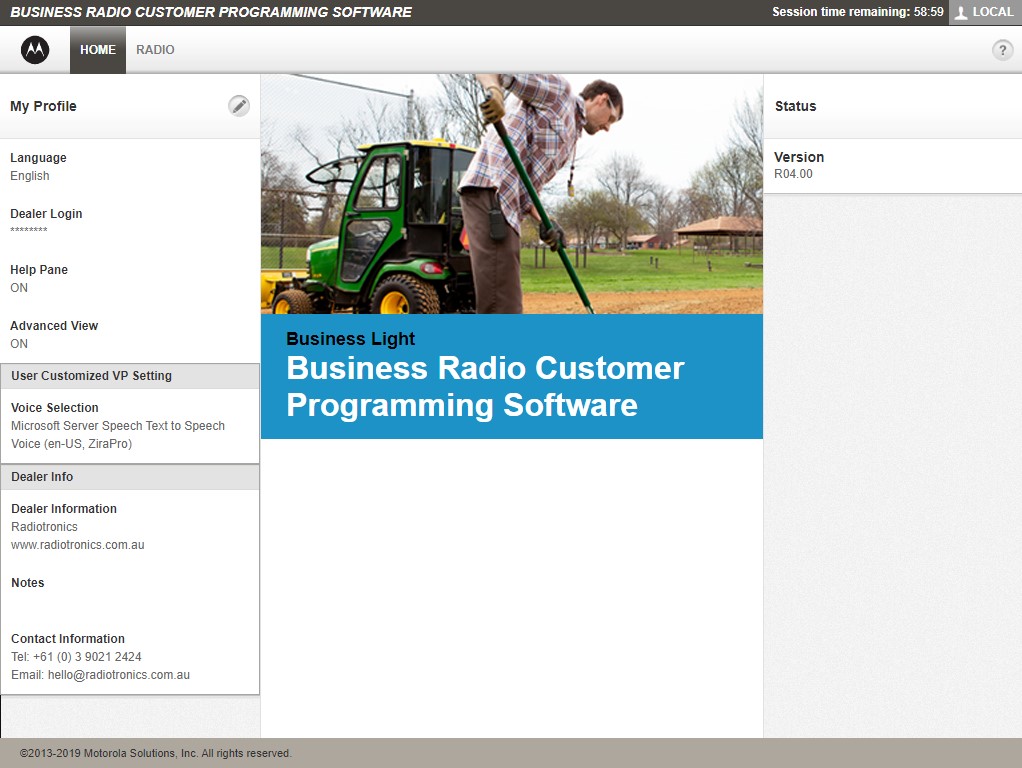
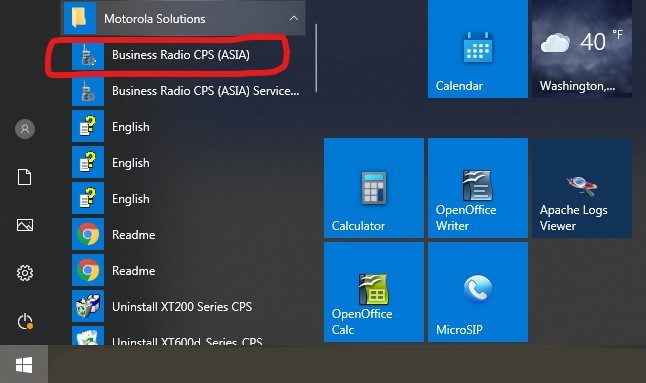
Step 1 – Open The Software
You will find the software in the Windows 10 start menu under “Motorola Solutions” > “Business Radio CPS (ASIA)” > “Business Radio CPS (ASIA)”. Click on “Business Radio CPS (ASIA)” once and wait for it to start up.
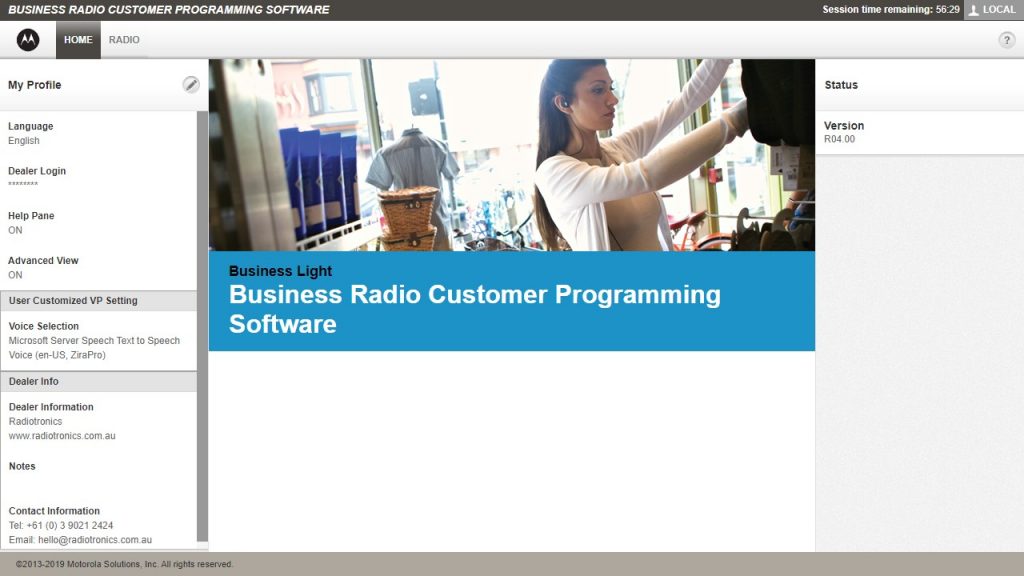
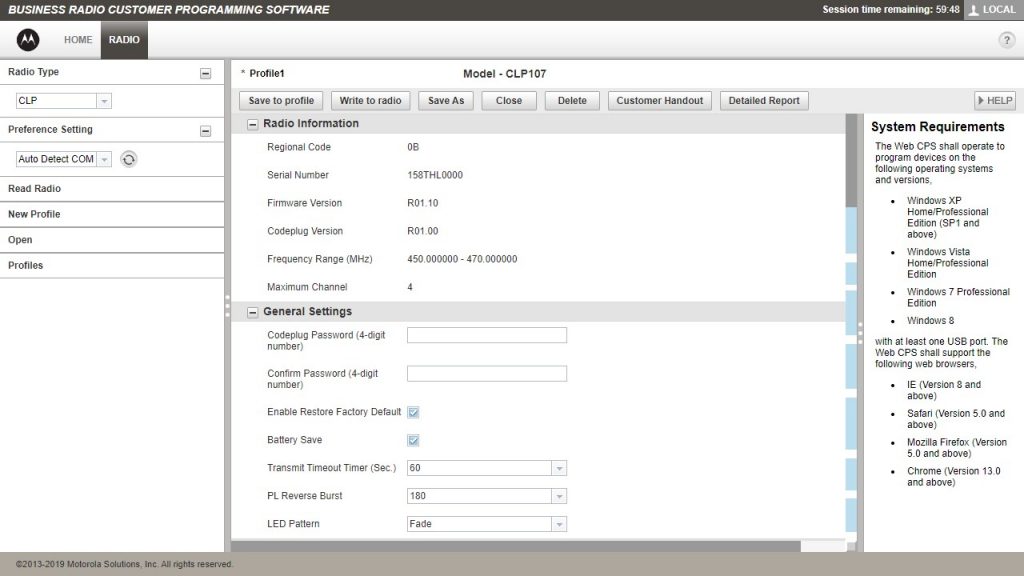
The software will open in a web browser and will look like this. Of course we have already filled in the dealer info ssection in our version so you will see Radiotronics in the dealer info on our screenshot here that will not be shown in yours.
Step 2 – Connect Your Radio
This step is a little tricky the first time you do it but follow this step to connect your CLP radio to your computer. Of course, this depends on whether you have the single charger or the 6-way charger. But it’s almost the same process.
Single Charger
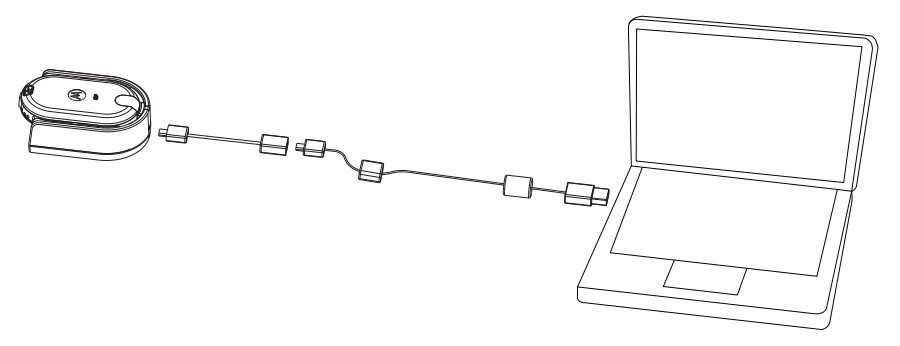
Connect the HKKN4027 cable to the PC or laptop. This makes it obvious which side connects to the radio. Next, connect the Micro-USB to Mini-USB fly lead (the smaller cable supplied). Then connect the smaller cable to the back of the CLP charger as shown below. These plugs only fit one way up. If they don’t go in easily observe the orientation. Don’t force them.
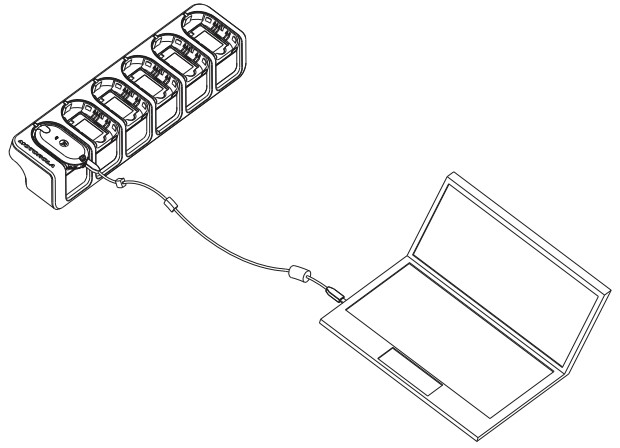
6-Way Charger
Connect the larger normal USB connector of the HKKN4027 cable to the PC or laptop. This makes it obvious which side connects to the radio. You do not need the smaller adapter cable for the 6-way charger. On the back of the 6-way charger, look at position 6 for example. There will be a little rubber flap that usually says “5V” on it. Lift this flap carefully using a small screwdriver revealing a micro-USB socket. Connect the micro-USB end of the cable to this micro-USB socket on the CLP 6-way charger shown below. These plugs only fit one way up. If they don’t go in easily observe the orientation. Don’t force them.
Step 3 – Read The Radio
Which radio should you read? Please read carefully.
Scenario 1 – Matching Another Radio
If you are looking to syncronise your new radio with an existing radio from a fleet of radios you alreday have. An example is that you’re a security guard who’s purchased your own radio and you need it to work with the radios at work…
In this scenario the radio you need to read here is the existing radio. Do not read your new radio here. By reading the existing radio, the programming will be opened in the software.
Scenario 2 – Brand New Radios (No Previous Radios)
In this scenario you have a number of brand new radios and no existing or old radios you need to put on a particular frequency.
Let’s assume you’ve also purchased an ACMA-issued licence. If you need an ACMA-issued licence, contact us.
In this scenario you need to read any one of your new radios. By reading this radio it will open the correct “profile” ready for adding your new ACMA-issued frequencies.
Reading The Radio
Along the top, click the “RADIO” tab. This will take you to the radio information screen. Next, click on “Read Radio”.
Troubleshooting: If you get an error at this stage check the following:
- You are uisng an HKKN4027 or HKKN4025 cable. Normal USB cables will not work.
- The HKKN4027 programming cable is connected to the back of the charger and plugged in correctly. Don’t force it.
- The radio is switched ON and fully charged.
- The cable has properly registered in device manager as a COM port. How? Read this article here.

Inspecting The Radio Information
As soon as the radio is completely read into the software the radio information screen will appear. At this stage, it’s good practice to save a copy of this information by clicking “Save As”; but it’s optional.
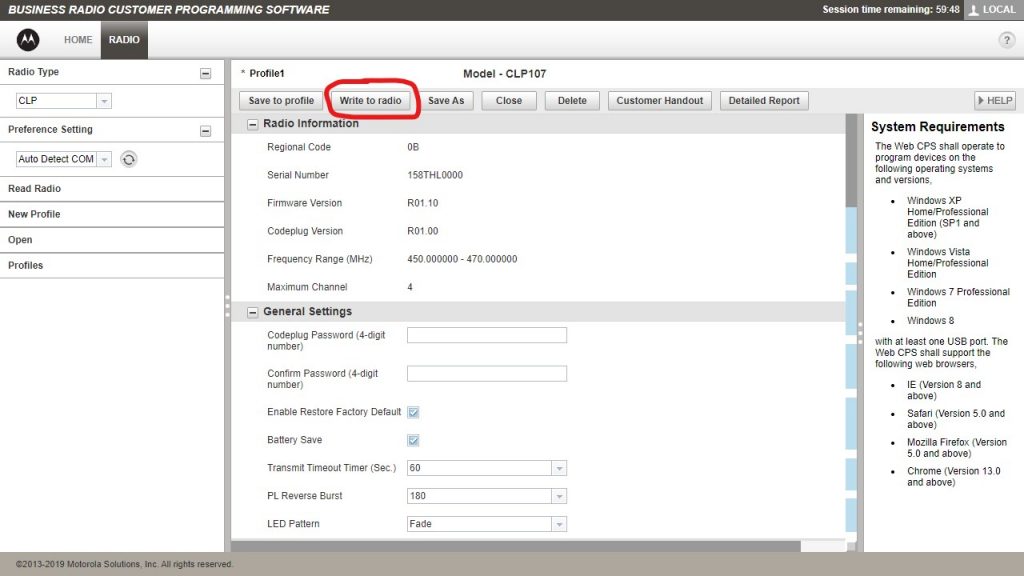
Optional: Write To A New Radio
If you were programming your CLP radio just to make it work with an existing radio: You would simply plug in your new radio, via the charger, now, make sure it’s switched on, and click “Write to radio” in the software. The radio will reboot itself and it will work woith your existing radios. Repeat this step with all new radios you wanted to syncronise with old radios. That is the end of your programming journey.
If you are programming a new radio fleet from scratch, skip this step.
Part 2 – Frequencies & Channels
Next, in Part 2 we exmplore how to customuse channels.
Step 4 – Activating Dealer Mode
Motorola’s CLP radois can broadcast anywhere between 450 MHz and 470 MHz. That means, if programmed incorrectly, they have the potential to cause interference to other radio users, or even be used illegally.
Ignorance is no excuse. Transmitting illegally could land you with a very large fine and prison time for serious repeat offenders.
For this reason, the Motorola CLP programming software does not allow the frequency table to be edited by default so that the user cannot accidently set the radios to broadcast on frequencies they do not have permission to use.
Changing the frequencies requries the software to have “dealer mode” activated. This is done by entering a password in the “Dealer Login” section on the “Home” tab.
Strict Critera
In order for Radiotronics to provide you with the “Dealer Login” password to enable dealer mode we have strict critera we are required to work to. You must meet one of the following criteria and provide the evidence required.
First, place your order for the Dealer Password EID Licence Key here. When you recveive your order confirmation, send us the evidence from the table shown below.
Radiotronics will not provide the dealer-mode activation password without the evidence.
| Critera | Evidence Required |
|---|---|
| An authorised Motorola Solutions dealer. | Motorola Solutions dealer agreement. |
| A business two-way radio ACMA-issued licence holder. | A PDF copy of the ACMA-issued licence. |
| A licensed radio radio amaterur. | A copy of your radio-HAM licence. |
| Demonstrate RF competence. | A photocopy of your academic qualifications. |
In order to request the dealer password, place your order for the Dealer Password EID Licence Key here. When you recveive your order confirmation, send us the evidence from the table shown below.
Entering Dealer Mode
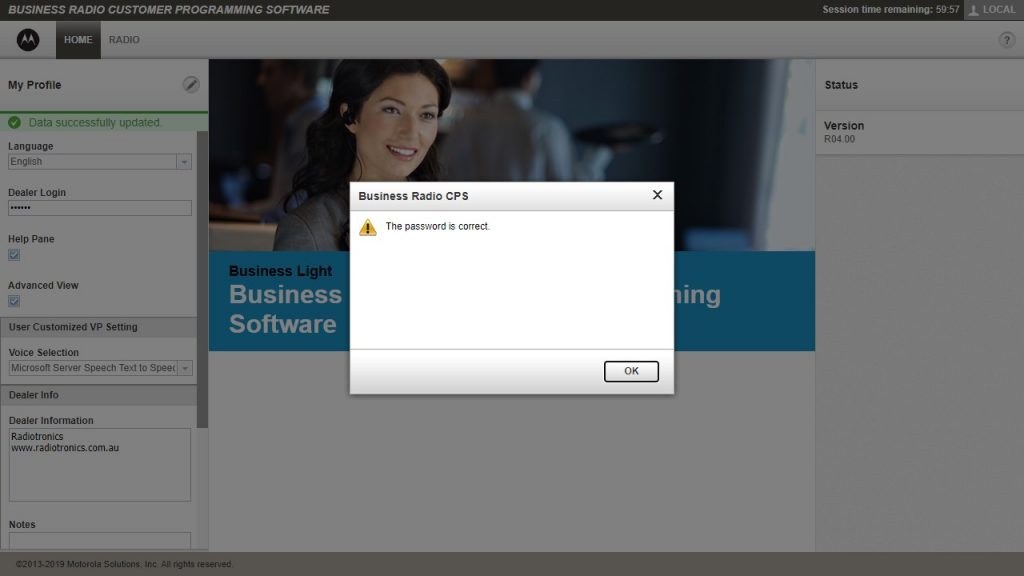
Click the “HOME” tab on the software. On the left side there is a section called “My Profile” and to them right of that there is a diagonal pencil icon which is an edit button. Click this pencil and the profile section will become editable.
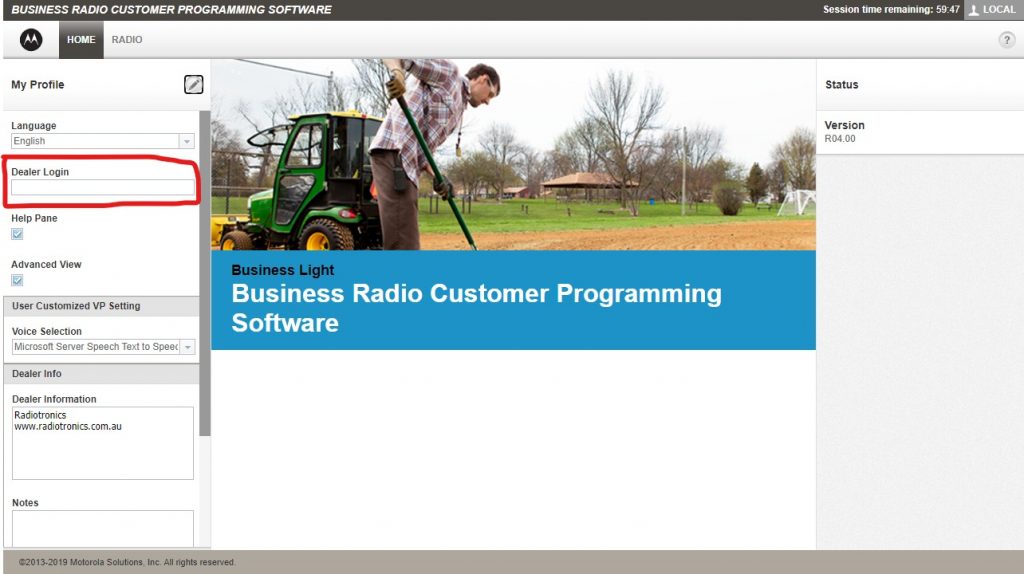
Enter the dealer password into the “Dealer Login” box and click the diagnoal pencil again. If it was correct, the password will be accepted. There will be a green message saying “Data successfully updated” as ell as a dialogue box with the message “The password is correct”. Click OK. Then click the diagonal pencil again to save it. Now you’re ready to move on.
Step 5 – Adding Your Frequencies.
Go back to the “RADIO” tab and the radio information should still be open. If this has disappeared, read the radio again as shown in Step 3 then immediately come back here to Step 5.
Remove Any Existing Channels & Frequencies
When the CLP107, CLP117 and CLP107e are delivered from Motorola Solutions they might have between 1 and 99 frequencies already programmed into them. These are test frequencies. They need to be removed.
Note: If you transmit on any of these test frequencies you are breaking the law.
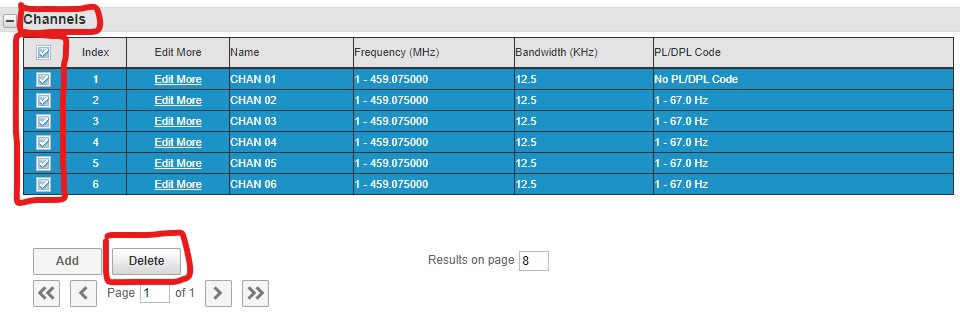
Remove All Channels
In a Motorola CLP radio, channels are not frequencies. A channel references a frequency. Before you can remove the test frequencies, you need to remove the channels that refrence them. It’s easier to just delete all chanels. Scroll down to the “Channels” section. Check the boxes on the left and click the “Delete” button. Keep doing this until all channels are removed.
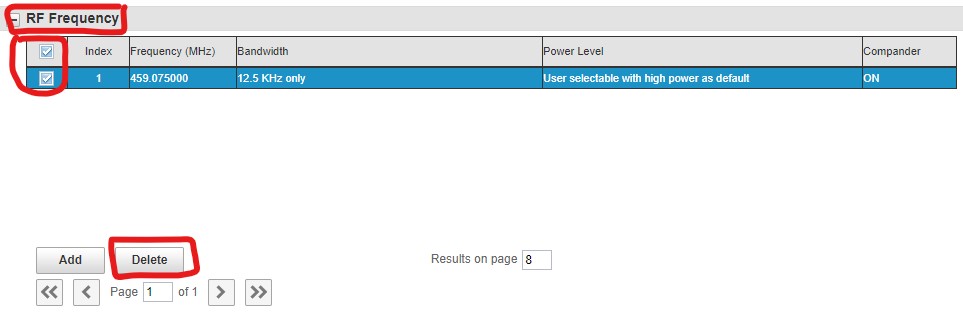
Remove All Frequencies
Delete all by checking the box on the left as you did with channels.
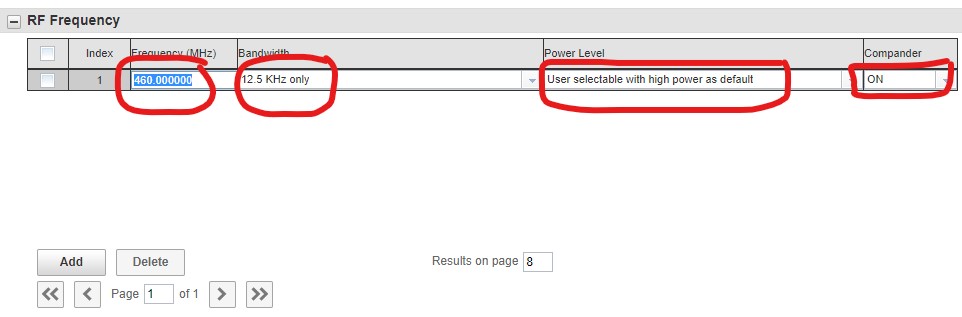
Add Frequency
Now is the time to dig out that ACMA-issued licence and get the frequency. Click the “Add” button.
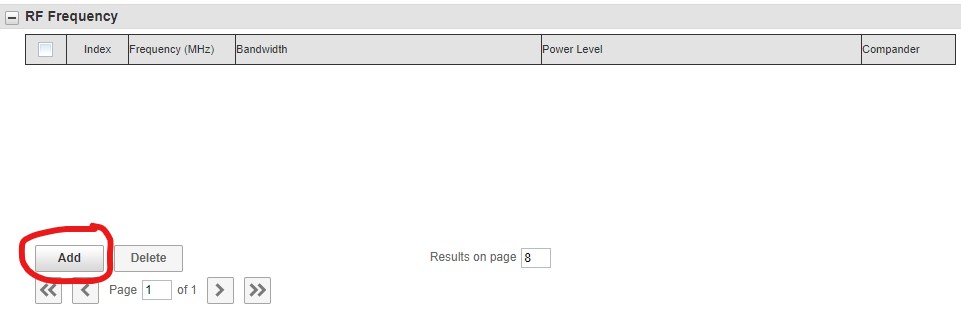
A row will be added as shown below. Type the frequency into the frequency box, select the correct bandwidth as shown on your ACMA licence.
You can leave “User selectable with high power as default” for the power setting. This is because the CLP cannot transmit above 1W so even high power is pretty low power.
The compander is a compressor/expander that can help with removing the scratchy radio sound. Compander can be set to ON if you’re only using other Motorola CLP radios. However, if you plan to use your CLP radio other make and mode, radios, it’s recommended to switch Compander OFF.
Continue to add more frequencies if you have more than one.
If you have been given a repeater duplex frequency pair, be sure to enter both frequencies here.
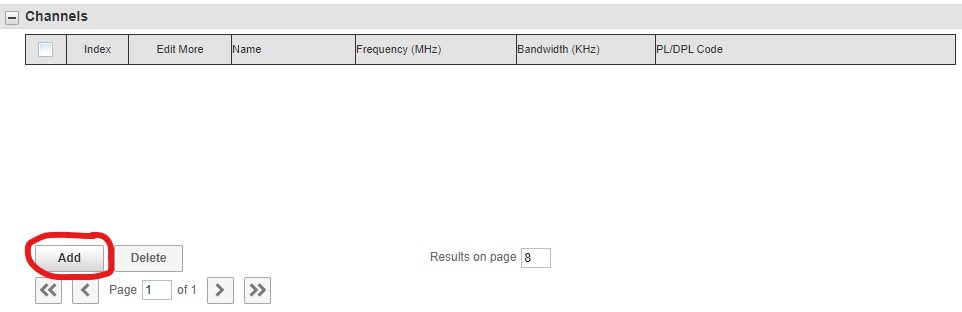
Add Channel
As described above, channels are not frequencies. A channel references a frequency (or two in the instance of a repeater). You will need to add at least one channel to use your CLP radio in order to use it.
In the “Channels” section, press “Add”.
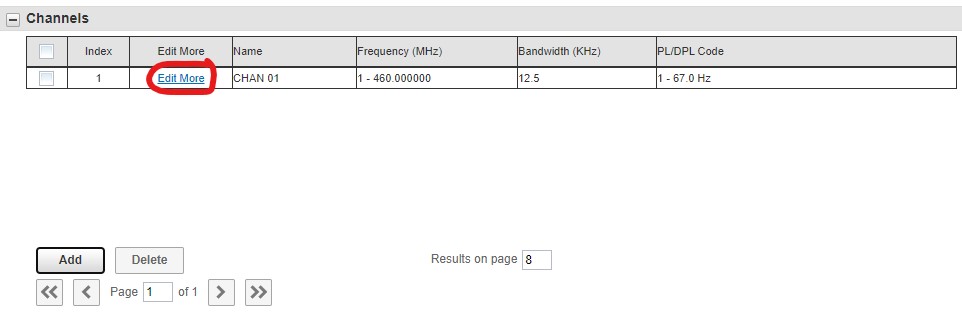
Now click “Edit More”. This will open a dialogue box/more info page.
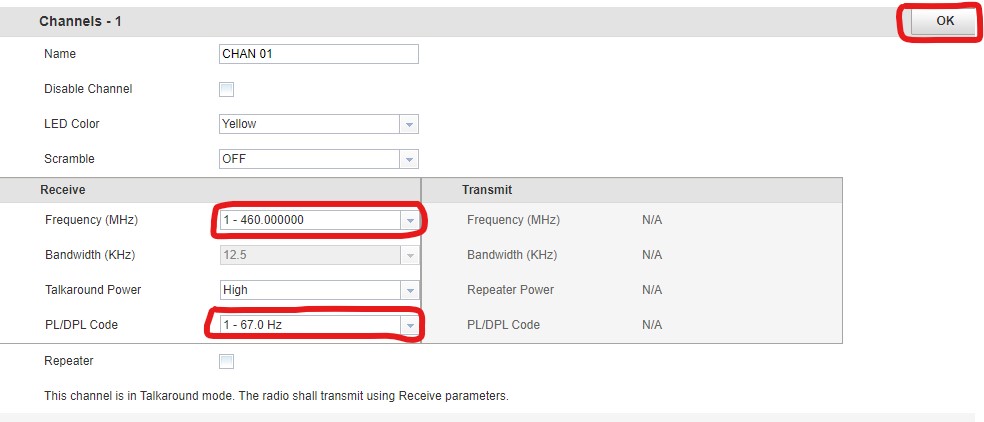
Simplex (Non-Repeater) Channel
Select the correct frequency from the list.
PL/DPL is what Motorola Solutions called CTCSS/DCS. If a CTCSS or DCS is shown on your licence, you should use the CTCSS specifically given to you. If not, you can select any CTCSS/DSC code.
This is a single channel complete. Press OK.
Tip: You can add as many channels as your model CLP allows. Then give them separate CTCSS (PL) or DCS (DPL) codes. As long as they’re not used at the same time, tehre will be no collision.
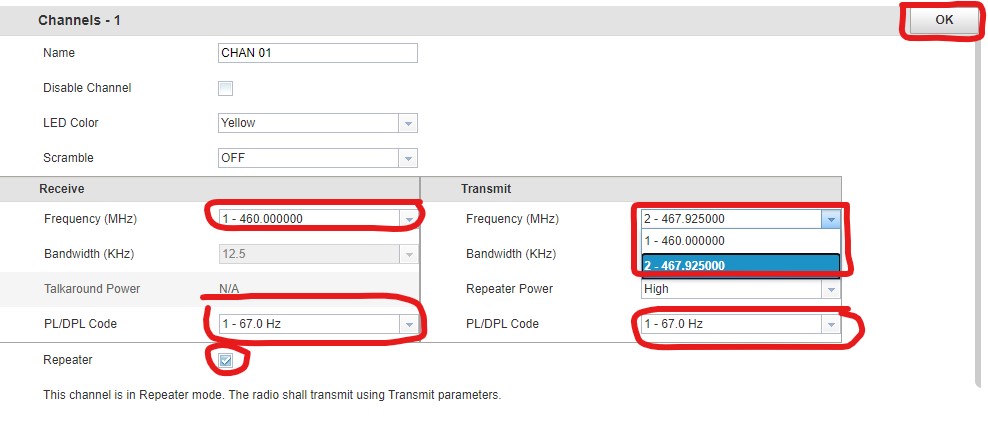
Repeater Channel
If ACMA has granted you a duplex channel and you’re using a repeater, you can activate this by checking the “Repeater” box below. This will then enable you to select separate recieve and transmit frequencies, presuming you added 2 frequencies above.
PL/DPL is what Motorola Solutions called CTCSS/DCS. If a CTCSS or DCS is shown on your licence, you should use the CTCSS specifically given to you. If not, you can select any CTCSS/DSC code.
This is a repeater channel complete. Press OK.
Tip: Remember that this being a portable radio means your repeater’s recieve frequency should be your transmit frequency here and vice-versa.
Part 3 – Customising Features
Next, in Part 3 we explore how to customise features.
Part 3 will be available very soon.